About
EXIF Complete is a Adobe Lightroom plugin which enables you to add EXIF information to your images. This comes in handy whenever your camera wasn't able to set the EXIF data by itself (e.g., using a legacy lens on a digital camera body) or you shot analog and scanned your images. And the bests: It's freeware.Version 2 of EXIF Complete lets you set the following EXIF data fields:
| › Lens identifier string | |
| › Focal length | |
| › Aperture value | |
| › Camera manufacturer (make) | (not supported for RAW files) |
| › Camera model (model) | (not supported for RAW files) |
| › Exposure time | (not supported for RAW files) |
| › ISO value | (not supported for RAW files) |
Download
| Version | LR3 | LR4 | LR5b |
Howto
Installation
Using the plugin is fairly straightforward in case you worked with Lightroom plugins before. Open up Lightroom and select 'File' > 'Plugin Manager' from the menu. Under the left column click on 'Add' and select the EXIF Complete 2 plugin. The plugin is now installed and you are almost ready to go.When you click on 'EXIF Complete 2' in the left column of Lightroom's plugin manager, the plugin configuration opens up on the right. Below is a screenshot of the two interesting sections from the plugin configuration.

In the first section you can predefine lens and camera information. The values entered here will show up in the plugin's dialog. In that way you do not have to retype the information every time you use the plugin. Of course you can still enter new information in the plugin's dialog. So, go ahead and enter the identifier strings of the gear you regular shoot with. Come back to the plugin's configuration whenever you want to modify this information.
Contrary to the first section, the second isn't optional. You probably only have to fiddle with it once, though. In the second section you must provide the path to the EXIFTOOL executable. In case you haven't downloaded and installed/unzipped it yet, now is the time. Windows users must specify the complete path to the executable (including 'exiftool.exe'). Mac users are the lucky ones here. Entering 'exitool' is usually sufficient (entering the full path doesn't hurt, though).
That's it. You are ready to go.
Using the plugin
Select all the images in Lightroom's library view for which you want to modify the EXIF information. Before starting the plugin make sure that you saved the image's metadata to your hard-disk ('Metadata' > 'Save metadada to disk'). Otherwise all previous made modifications will be lost. A warning message will remind you upon starting the plugin.With the images marked, select 'File' > 'Plugin' > 'EXIF Complete 2' from the menu to open the plugin. The screenshot below shows the plugin's main dialog.

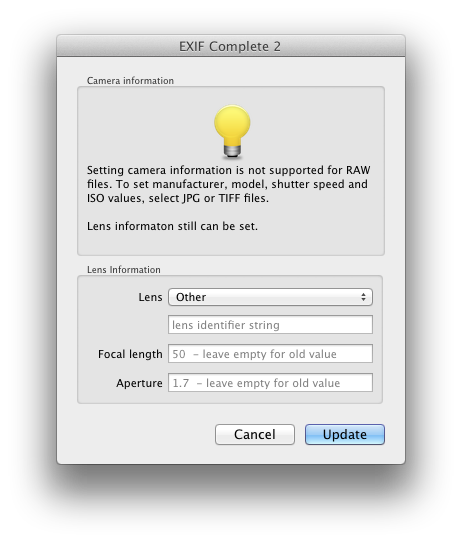
The fields of the plugin are quite self-explanatory. Use one of the drop-down menus to select one of your predefined identifier strings or select 'other' to enter a new value. By not specifying a value, the value already stored in the image's EXIF information will be preserved. Hit 'Update' and the entered information will be applied to all in Lightrom's library module marked images. Depending on the amount of pictures this may take a while. A couple of minutes for multiple images is normal!. After all EXIF information is written, follow the plugin's instructions and reload the image's metadata so it shows up in Lightroom ('Metadata' > 'Read metadata from disk').
There is one limitation with the plugin. Setting or altering camera information (make or model) is only possible for JPG and TIFF files. RAW files are not supported. The reason behind this is that each RAW format has a slightly different EXIF dataset. Lightroom will get mixed up in case the EXIF make field specifies vendor X but the format of the EXIF dataset follows the one of vendor Y. In order to avoid such hassle, the plugin's dialog will look like the screenshot below in case you selected a RAW file.

That's it. Now go out and snap some nice pictures. :-)